Connectors between compartment shape entries with DSL Tools – part 2
Tags: dotnet, dsl, JaDAL, orcas, visual studio, vsx7 Comments »
[Update (2008-05-21): This code is now hosted at CodePlex as part of JaDAL. And a follow-up article was published.]
Previously on…
This article is part of a series. A table of contents can be found at the end of the first article. In that article you can also find a brief overview.
User guide
If you read this article to this point you will properly use or at least evaluate the CompartmentMapping library. I will provide you with a step-by-step tutorial. There are pretty some steps, but its the shortest way I could imagine to create my solution. Please give it a try. 🙂
- You need TTxGen to generate some code from my templates. See my last article for more information and a workaround for an installation problem.
- I assume you have a DSL solution and at least two Domain Classes mapped to two compartment shapes and two more Domain Classes used as entries of the compartment shapes created. In my example these classes are called
Parent1,Entry1,Parent2andEntry2.
The entries need a unique identifier. You could use a name property for this, but there will be some difficulties if the user creates two entries in one shape with the same name, so I will use a guid. (Don’t forget to create a new guid in the constructor or another proper place.) - Create a Reference Relationship from
Parent1toParent2. This will be automatically namedParent1ReferencesParent2. We will use this reference to present the relationship from one entry to the other. I would like to create Reference Relationships from this relationship to the entries, but relationships of relationships are not supported. We have to store the guids of the entries in the relationship and add two Domain Properties for this purpose to it. I named themfromEntryandtoEntry.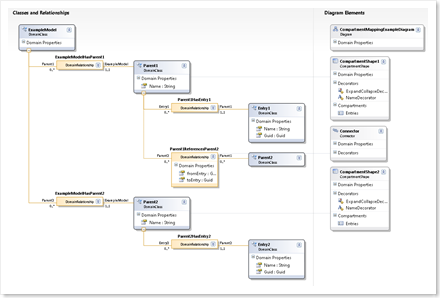
- Set the
Allows Duplicatesproperty of theParent1ReferencesParent2relationship totrue. - Set the
Is Customproperty of the Connection Builder (Parent1ReferencesParent2Builder) in the DSL Explorer totrue. - Add a reference to
CompartmentMapping.dllto both theDslandDslPackageproject. - Add a new xml file (in my example
CompartmentMappings.xml) to your solution and write the following code in it:<?xml version="1.0" encoding="utf-8" ?> <CompartmentConnections xmlns:xsi="http://www.w3.org/2001/XMLSchema-instance" xsi:noNamespaceSchemaLocation="CompartmentMappings.xsd" namespace="BenjaminSchroeter.CompartmentMappingExample" > <CompartmentConnection> <CompartmentSource> <DomainClass name="Parent1"/> <EntryDomainClass name="Entry1"/> <Shape name="CompartmentShape1" /> </CompartmentSource> <CompartmentTarget> <DomainClass name="Parent2" /> <EntryDomainClass name="Entry2" /> <Shape name="CompartmentShape2" /> </CompartmentTarget> <Connection name="Parent1ReferencesParent2"> <Shape name="Connector" /> </Connection> </CompartmentConnection> </CompartmentConnections>
(If you place the xsd file in the same directory you get IntelliSense and error checking for free.)
- Place the
CompartmentConnections.ttfile in the same directory and right-click on the xml file and choose Generate xGen Template. ACompartmentMappings_xGen.ttfile will be created below the xml file and there you have to add the following lines:<#@ ParentFileInjector processor="TTxGenDirectiveProcessor" requires="fileName='CompartmentMappings.xml'" #> <#@ include file="CompartmentConnections.tt" #>
(Be sure you use the right xml file name here.)
Now press the Transform All Templates Button in the Solution Explorer to generate the the code from this template.
- Now you have to write code by yourself (nearly by yourself, the frames are generated, too). Take a look at the generated cs file
CompartmentConnections_xGen.cs.At the top you will find commented code. Copy this code to a new cs file and remove the comments. All code you will write for the compartment mappings you will write in this file.
- Complete the
CreateElementLink()method in this file. Here you have to add code to store the selected compartment entries for source and target in the properties of the relationship (see 3).protected override ElementLink CreateElementLink(Parent1 source, SelectedCompartmentPartType sourcePartType, Entry1 sourceEntry, Parent2 target, SelectedCompartmentPartType targetPartType, Entry2 targetEntry) { Parent1ReferencesParent2 result = new Parent1ReferencesParent2(source, target); result.fromEntry = sourceEntry.Guid; result.toEntry = targetEntry.Guid; return result; }
- In the
CreateElementLink()method you have stored the source and target entry information somewhere; my library does not know about this location. So we need two more methods to compare an entry with a relationship and answer the question "Is this entry the source of a given relationship?" and the same for the target. These code resists in the same file:public override bool IsEntryConnectionSource (Entry1 entry, Parent1ReferencesParent2 connection) { if (entry == null) return false; return connection.fromEntry.Equals(entry.Guid); } public override bool IsEntryConnectionTarget (Entry2 entry, Parent1ReferencesParent2 connection) { if (entry == null) return false; return connection.toEntry.Equals(entry.Guid); }
Always care for
entry == nullthis will be used to check whether the head of the shape is meant. Even if you do not allow the head as source or target this method will be called with anullparameter from time to time. - Create a
partial classfor your Domain Model (CompartmentMappingExampleDomainModel) and add the following methods.protected override Type[] GetCustomDomainModelTypes() { return CompartmentMappingUtil.AllCompartmentMappingRules(this); }
(If you have already some custom rules, you can use an overloaded version of the
AllCompartmentMappingRules()method.) -
In the
DslPackageproject create apartial classfor the generated Command Set and add the following code:protected override IList<MenuCommand> GetMenuCommands() { return CompartmentMappingUtil.RemoveRerouteCommand (base.GetMenuCommands()); }
That’s all. Only 13 steps, a few settings and conventions and 10 lines of C# code to write. I know it is not very easy but I think it is ok. And the best: as you will see it is working.
Now compile and start you solution. You can now create connectors from one entry of the Parent1 shape to an entry of the Parent2 shape. Great – isn’t it?
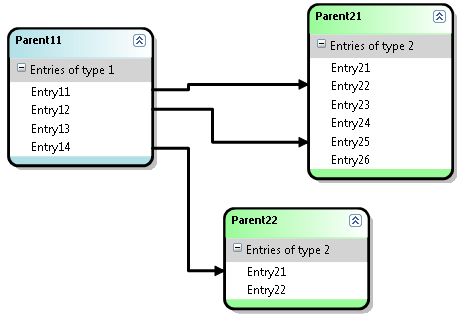
Take a look at the properties in the Properties window when selecting a connector. You see the guids of the corresponding entries and can use them in your code when working with this connections for code generation or whatever you need to do.
Advanced options
There are some more options besides the basics described above to configure and extend the compartment mappings.
Some of them can easily turned on in the xml file:
- For
CompartmentSourceandCompartmentTargetyou can specify an attribute calledallowHeadAsSource(andallowHeadAsTargetrespectively) and set it totrue, to allow the head of the compartment shape as source or target. Remember, if you do this theCreateElementLink()method will be called withnullvalues for the entries and you have to handle this. - On the
Connectionelement there are two more optional attributes, too.If you set
allowSelfReferencetotruethe user can create connections from one entry of one shape to another (or the same) entry of the same shape (source = target). This makes only sense if you specifyCompartmentSourceandCompartmentTargetto be the same Domain Class and the same shape.With the
suppressEntryDeletePropagationattribute set totrueyou suppress the deletion of the connection when a corresponding compartment entry is deleted. Be careful with this setting: Wrong connections will remain in your model and produce ugly diagrams. - One of source and target can be a regular shape (that is a geometry or image shape and not a compartment shape). Replace either
CompartmentSourcewithSourceorCompartmentTargetwithTarget. For these elements you don’t need to define aEntryDomainClasselement since regular shapes do not have entries.
You can add even more code to the C# file from step 9 to 11. There are two more methods you can override: CanAcceptAsCompartmentSource() and CanAcceptAsCompartmentSourceAndTarget(). If you do so, the DSL editor will ask your code while the user moves the mouse over shapes when creating the connection to identify the current shape and entry as a valid source or target in you scenario. It is pretty much the same pattern as used in the DSL Tools itself. But remember, this method will be called very often und should have a very short running time.
Download
Update
This code is now part of the JaDAL – Just another DSL-Tools Addon Library project. Please download the current version from that page. The download over at CodePlex contains the source code described here, an example DSL language and the library as a binary. Future enhancements of the code will be published there, too.
Upcoming articles
Part 3 and part 4 of this series will give an in depth view into the internals of the library.

Recent Comments