Windows Live Writer Plugin for <code> in WordPress

Tags: , , ,
No Comments »

I wrote the last posts (and also this one) with Windows Live Writer (aka. WLW). It is a very powerful offline client for writing posts to many different blog systems. Although it is a Microsoft software you can post to WordPress blogs.

But I was missing one function I’m using very often when I write posts on programming. There is no way in the WYSIWYG editor of WLW to format Text like this. In WordPress you can use the <code></code> tags for code-like formatting. But in WLW I had to switch to the HTML Code view to add these tags.

Since there is a good API to add features to WLW I tried to write my first Windows Live Write Plugin:

[WriterPlugin("{52D29C0E-49E6-4353-B58C-458F86CA1E2B}", 
                                           "Inline Code Plugin")]
[InsertableContentSource("Inline Code")]
public class WlwInlineCodePlugin : ContentSource
{
    public override DialogResult CreateContent
                (IWin32Window dialogOwner, ref string newContent)
    {
        InputBox box = new InputBox("Insert inline code", 
"Insert the following in a <code> block:",""); DialogResult result = box.ShowDialog(dialogOwner); if (result == DialogResult.OK) newContent = "<code>" + box.Input + "</code>"; return result; } }

That’s really all the code (besides the InputBox. Just add the two attributes to a class and override the CreateContent() method. The code in this method is straight forward: Show some dialog, create the new HTML content and return the DialogResult.

After compiling you have to put the dll into the Plugin directory of your WLW installation and you will see a new entry in the Insert menu and on the sidebar. This entry is called "Insert Inline Code…" (ah, the text from the attribute goes there). When you click it a small dialog asks for the text and if you exit the dialog with the OK button this text is added to your document inside of <Code> tags.

In the zip file you will find the source code and the compiled dll.

Adding properties to Domain Classes at runtime with DSL Tools

Tags: , , , ,
3 Comments »

Each element you can see in a DSL Diagram within the DSL editor is based on a Domain Class defined in your DSL Definition. If the user selects on of these shapes in the Editor he can change the values of the defined Domain Properties in the well known Properties Window of Visual Studio, but only Properties declared at design time will be shown in the Properties Window.

For some reason I want to change the number, name and type of the properties at runtime. E.g. some code will add some properties to one shape while the user works with the DSL model. Different shapes based on the same Domain Class should be able to display different properties as well. Such a behavior is not support by the DSL Tools in the current version, so I build a small library as a workaround to provide this functionality. As I know some of you have a similar request, I will explain my approach here, and of cause publish the sourcecode of my library below.

What you get…

But first of all, let me show you what you can expect. So you can decide to stop reading my article right at this point 😉

I designed a new Class DynamicPropertyCollection which is a container of all new added properties. You will add a Domain Property of this type to your Domain Class at design time and then you can add more properties to this collection at runtime. I will care for showing these properties in the Properties Window.

prop14

You can see here the Properties Window while one Example Element is selected. The Name is the only regular designed Domain Property. The field Props is also specified at design time as a Domain Property of the type DynamicPropertyCollection, but the user can not insert any text to this row. But as you can see with the minus symbol in front of the Props row there are some subproperties. These are the dynamic added properties and you can change these list at runtime as promised. The subproperties can contain any data type that can be used with the properties grid, and even more DynamicPropertyCollections. The even more row contains such an element:

prop24

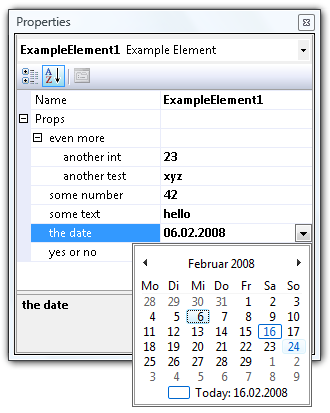
There are two additional properties hidden below the even more row and as you can see, all user interface features like the calendar on DateTime values are supported out of the box (all this comes with the great properties grid control).

Maybe you can claim I did not really keep all my promises because I did not add additional properties to the Example Element rather to using these sub properties. That’s right, but I think it’s very close and there are many advantages with this: You do not need to add code to the Domain Class, the Shape or anywhere within the generated classes and you can only use my DynamicPropertyCollection class as a black box (although I try to whiten it here a little bit).

How does all this magic work?

The trick comes with the ICustomTypeDescriptor Interface. Normally the properties grid will use reflection to access all public properties of a class and shows these properties in the grid. But if you implement this interface the grid will ask you for a list of all properties in a PropertyDescriptorCollection. This question I can answer with another list of properties each time and so I can show dynamic properties for each element.

In my code you find a DynamicPropertyCollection class that implements this interface and uses for most methods a default implementation, but some special code for public PropertyDescriptorCollection GetProperties(Attribute[] attributes). Internally there is a private readonly List<DynamicProperty> properties that contains all these properties.

The DynamicPropertyDescriptor objects returned by GetProperties() contain every information the property grid needs to show the list. Further more it will delegate get and set operations for the properties to this DynamicPropertyDescriptor which stores the values in the underlying DynamicProperty objects.

As a user you will hardly see the DynamicPropety or DynamicPropertyDescriptor class and need not to worry about these details. You can only work with the public interface of DynamicPropertyCollection:

public void AddProperty(string name, Type type)
public void AddProperty(string name, Type type, object value)
public void RemoveProperty(string name)
public bool ExistsProperty(string name)


public
Type GetPropertyType(string name) public object GetPropteryValue(string name) public void SetPropertyValue(string name, object value)

With this few classes and only few lines of code you get the properties shown as in the screenshots above!

…but how to serialize?

But this is only half the way to go. We need to serialize all the properties with the Domain Model and deserialize them when loading a model. Since the DynamicPropertyCollection is part of the Domain Class as a Domain Property this seems to be the right and natural place to store all the values. The DSL Tools will use the TypeConverter of each type to convert the object to a string, so we have to provide a TypeConverter for the DynamicPropertyCollection:

public class DynamicPropertyCollectionTypeConverter : ExpandableObjectConverter

and attach this TypeConverter to the DynamicPropertyCollection:

[TypeConverter("BenjaminSchroeter.DynamicDslProperties.DynamicPropertyCollectionTypeConverter")]

public class DynamicPropertyCollection : ICustomTypeDescriptor

(There is a known issue and a workaround I described here with the TypeConverterAttribute and the DSL Tools…)

The DynamicPropertyCollectionTypeConverter inherits from ExpandableObjectConverter to provide the expandable functionality in the properties grid, but all the other code is used for serialization only.

I have to provide Code to convert from and to string. In my string representation I have to store all properties with there name, the type and the value, of cause. To store the different values I use a TypeConverter and convert the objectvalues to string as well. So you can only use types that can be converted to and from string, but that are all types most people use in the Properties Window since the user can only type and see strings there.

The representation in the XML file of your DSL will look like this:

<exampleElement name="ExampleElement1">
<props>
name_1="some text" type_1="System.String" value_1="hello"
name_2="some number" type_2="System.Int32" value_2="42"
name_3="yes or no" type_3="System.Boolean" value_3="True"
</props>

As you see, it is still human readable.

What should I do?

If you only want to use the library look at the following steps:

  1. Compile the DynamicDslProperties code as a library and add a reference to your DSL project. Maybe you want change the key file for signing.
  2. In the DSL Explorer you have to add a External Type with Namespace = "BenjaminSchroeter.DynamicDslProperties" and Name = "DynamicPropertyCollection".
  3. Now you can add a Domain Property of type DynamicPropertyCollection to any Domain Class.
  4. Change the Default Value of the property to " " (one space only). This is crucial to initialize the class on creation of new Domain Elements! Otherwise the new Domain Element will have a null value for this property and you must handle it at various places.
  5. In the DSL Explorer look at the Xml Serialization Behavior of the property of this Domain Class and change the field Representation from Attribute to Element. This step is optional but provides you a much nicer XML representation.
  6. Add somewhere code to add properties to the DynamicPropertyCollection. Remember to wrap this and all changes to properties in a transaction.

For testing and debugging

For a fast jumpstart and to test the features I provide a small dialog to add and delete properties.

edit6

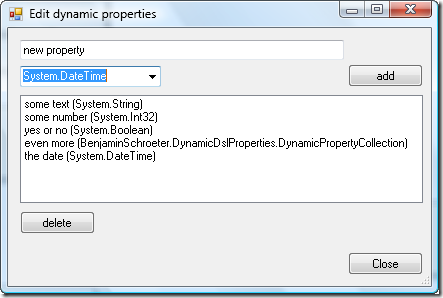
You can simply add some code to a shape to open this dialog on double click.

partial class ExampleShape
{
  public override void OnDoubleClick(DiagramPointEventArgs e)
  {
    ExampleElement elem = e.HitDiagramItem.Shape.ModelElement as ExampleElement;
    if ( elem != null)
    {
       EditDynamicPropertiesDialog f;
f = new EditDynamicPropertiesDialog(elem.Props, elem.Store); f.ShowDialog(); } base.OnDoubleClick(e); } }

Of cause this window and the DoubleClick event are only good while debugging and testing. For real world projects you will use the public interface described above to add and remove properties.

The code

In the zip file you will find the whole sourcecode of the described library to use in your projects. Just leave my copyright and the link to this article in the header of each file and do not expect any warranty. If you extend the library, find or fix some bugs I would appreciate a comment here.

There is also a whole DSL project in the zip file to try my code right away.

dynamicdslpropertiessource.zip

Update

This code is now part of the JaDAL – Just another DSL-Tools Addon Library project. Please download the current version from that page. The download over at CodePlex contains the source code described here, an example DSL language and the library as a binary. Future enhancements of the code will be published there, too.

Using a mobile phone as GPS logger

Tags: , ,
No Comments »

With the Java software GPSLog you can use an ordinary Bluetooth GPS receiver with a Bluetooth enabled mobile Phone as a GPS Data logger. Only connect the two devices and start logging with the GPSLog software. It is very easy and you can simply create nmea log files and use it with other GPS software like PhotoTagStudio or translate these log files using GPS Babel.

I use GPSLog only to display the current position and the current time of my GPS Logger to take a photo of the display with the current time displayed. In PhotoTagStudio you can use such a picture to synchronize the GPS log time and the camera time.

I wrote more about my GPS logger and GPS Babel in this article and more about GPS earlier in this blog.

g-brief in LaTeX and “\Telefon already defined” problem

Tags:
3 Comments »

g-brief is a document class for LaTeX to write German standard letters. I like this document class very much and prefer it much over the Microsoft Word letter templates.
But on some machines I get the following error message when compiling the document using the MiKTeX packages:
   LaTeX Error: Command \Telefon already defined.

There is a simple solutions to resolve this error. You can just patch the package. Somewhere below the LaTeX directory you should find the marvosym.sty file. Open this file with a text editor of your choice an search for a line like this:
   \newcommand\Telefon{\mvchr{84}}
There you can change the name of the command \Telefon to something like \Telefonsymbol or the even better way (but I did not test this one): replace \newcommand with \def and leave Telefon as it is.

Another g-brief tip: you can define the following three elements on your document to turn on these various features:
\fenstermarken
\faltmarken
\trennlinien

Workaround for Known Issue with TypeConverters in DSL Tools for Visual Studio

Tags: , , , ,
6 Comments »

When I tried to add a Domain Property with a custom TypeConverter to my Domain Class I ran into serious problems. Sometimes it worked and this property was shown correctly in the properties window using the custom TypeConverter, but sometimes not. I was desperately searching for a bug in my code for hours but then I figured out: Each first build after a solution cleanup was working and all other builds not. Even when I start the working build a second time without rebuilding it, the custom TypeConverter was not used.

This looks very much like the number 1.10 (the second 1.10 😉 ) in the known issues list posted on the VSX Team blog:

1.10 TypeConverters and TypeDescriptors are not picked up during the build process or during toolbox initialization.
When adding a custom TypeConverter or TypeDescriptor and then building the DSL, the TypeConvertor or TypeDescriptor is not picked up. The workaround is to rebuild the solution with a clean build.

And as you see: I discovered this workaround for myself, too. But I also found another workaround. I’m not sure if it is working for all situations with the described known issue but if you have the same problem you might want to try it. If it works or not, please comment some feedback here.

I simply used another constructor of the TypeConverterAttribute. Instead of providing the type information I used the constructor with a string:

// this one does not work:

[TypeConverter(typeof(DynamicPropertiesTypeConverter))]


// this one is not nice, but works:

[TypeConverter(“BenjaminSchroeter.DynamicPropertiesTypeConverter”)]

public class DynamicProperties : ICustomTypeDescriptor


CopySourceAsHtml Add-In with Visual Studio 2008

Tags: , ,
No Comments »

CopySourceAsHtml (CSAH) is a small and nice add-in for Visual Studio 2005 to copy the selected source code html-formatted to the clipboard. This is very useful if you want to paste this code into your blog (as I do here sometimes).

Unfortunately the current version 2.0.0 does not work with Visual Studio 2008 out of the box, but it is very simple to get it running.

The add-ins are located in below documents-folder in a path like this: C:\Users \Benjamin \Documents \Visual Studio 2005 \Addins. Just copy all files beginning with CopySourceAsHtml*.* to the corresponding folder for Visual Studio 2008: C:\Users \Benjamin \Documents\ Visual Studio 2008 \Addins.

Now you have to edit the CopySourceAsHtml.AddIn file with a text editor: only change at two positions in this short xml-file the Version value from 8.0 to 9.0.

After a restart of Visual Studio 2008 you should find the CopySourceAsHtml add-in in the Tools / Add-in menu and of cause in the context menu of the code editor.

First steps on aspect oriented programming

Tags: , , ,
No Comments »

Since I saw the first implementation of aspect oriented programming (AOP) frameworks for java I became a fan of AOP but it took a long time till now before I could start using AOP in my projects. The main reason was that simply no good and easy to use AOP framework for .net existed. There was one research project but you weren’t allowed to use their utilities in project other then research projects.
But a few weeks ago I discovered PostSharp and it is really great and very simple. If you have no idea what’s all about AOP you should read the Wikipedia article or the start page of the PostSharp project. There you find a short example showing the usage of an aspect in C# code.
I also want to show you my first experience with some aspect oriented programming.

First: the problem I want to address
I sounds very simple: I’ve got a base-class and some sub-classes. All provide a method GetName(). All sub-classes within the same type should return the same name that is given at compile time. It’s just a const string for each class. The following code addresses these needs in a straight forward way:

class BaseClass

{

    public virtual string GetName()

    {

        return “-“;

    }

}


class ClassA : BaseClass

{

    public override string GetName()

    {

        return “A”;

    }

}


class ClassB : BaseClass

{

    public override string GetName()

    {

        return “b”;

    }

}

Second: what I don’t like with this solution
This seems good, but I’ve got some more special needs. All classes are generated by the DSL Tools that means they contain much other code and no line written by me. In my use case these classes are shape-objects.
Thanks to the partial keyword in C# I could extend every class within its own .cs-file, but I didn’t like this. It would mean I have to create many additional .cs-files only for providing a single string to the class. But all other definition is stored in the DSL-model described by the DSL Tools and some part of the shape declaration is located in the .cs-files.
In the DSL-model I can provide each class with a custom attribute, so I’m looking for a solution with no additional code in the sub-classes besides a custom attribute.
With the use of reflection it could be the following:

class NameTextAttribute : Attribute

{

    public NameTextAttribute(string name)

    {

        this.Name = name;

    }


    public string Name { get; set; }

}


class BaseClass

{

    private string name = null;


    public virtual string GetName()

    {

        if (name == null)

        {

            object[] a = this.GetType().GetCustomAttributes(

                            typeof(NameTextAttribute),

                            true);


            if (a.Length > 0)

                name = ((NameTextAttribute)a[0]).Name;

            else

                name = “-“;

        }


        return name;

    }

}


[NameTextAttribute(“A”)]

class ClassA : BaseClass {}


[NameTextAttribute(“b”)]

class ClassB : BaseClass {}

This is working and as you see, no additional code is needed in the sub-classes. But nevertheless I would like to avoid using reflection. Reflection seems to me inappropriate in this case.

Third: Using AOP
The idea of AOP is to add code to the class that you can write in another position, in the aspect. The aspect weaver (in my case the PostSharp Laos library) adds this code on compiletime (not runtime!) to the class.
My strategy is to add some code after the constructor execution that will initialize the name-property:

class BaseClass

{

    public virtual string Name { get; internal set; }


    public virtual string GetName()

    {

        return this.Name;

    }

}


[NameAspect(“a”)]

class ClassA : BaseClass

{

    public void someMethodInA()   { }

}


[NameAspect(“b”)]

class ClassB : BaseClass {}


[Serializable]

class NameAspect : OnMethodBoundaryAspect

{

    private string name = “-“;

    public NameAspect(string name)

    {

        this.name = name;

    }


    override bool CompileTimeValidate(MethodBase m)

    {

        return m.IsConstructor;

    }


    override void OnSuccess(MethodExecutionEventArgs args)

    {

        BaseClass obj = args.Instance as BaseClass;

        if (obj != null)

            obj.Name = name;

    }

}

The base-class now provides a property name (declared with the new C# 3.0 syntax) and the GetName() method returning the property value. As in the last example the sub-classes have the attribute declared and contain no other code.
The magic happens in the attribute (or, if you like, somewhere in the PostSharp.dll). It is derived from OnMethodBoundaryAspect, an aspect base type where I can add code to a method in another class before and after the method call and on exception and on success of the method call.
My constructor of this aspect gets only the name string and stores it in a variable.
The code that should be executed every time a constructor of a class with this aspect is calls can be find in the OnSuccess()-method. Here only the property of the BaseClass will be set.
With the CompileTimeValidate()-method I can specify at compiletime for witch methods the code should be injected. For my needs this is only the constructor. All other methods of my class will not be changes by this aspect.

Fourth: behind the scene
With adding the PostSharp references to my project the PostSharp postcompiler is called automatically after compiling my assembly and the code is added. If you take a look with the Reflector you will see the following:

class ClassA : BaseClass

{

    static ClassA()

    {

        if (!~PostSharp~Laos~Implementation.initialized)

            LaosNotInitializedException.Throw();

        ~PostSharp~Laos~Implementation.~targetMethod~3 =

                methodof(ClassA..ctor);

        ~PostSharp~Laos~Implementation.NameAspect~3.RuntimeInitialize

                (~PostSharp~Laos~Implementation.~targetMethod~3);

    }


    public ClassA()

    {

        MethodExecutionEventArgs ~laosEventArgs~1;

        try

        {

            ~laosEventArgs~1 = new MethodExecutionEventArgs(

                    methodof(ClassA..ctor, ClassA), this, null);

            ~PostSharp~Laos~Implementation.NameAspect~3.OnEntry(~laosEventArgs~1);

            if (~laosEventArgs~1.FlowBehavior != FlowBehavior.Return)

                ~PostSharp~Laos~Implementation.NameAspect~3.OnSuccess(~laosEventArgs~1);

        }

        catch (Exception ~exception~0)

        {

            ~laosEventArgs~1.Exception = ~exception~0;

            ~PostSharp~Laos~Implementation.NameAspect~3.OnException(~laosEventArgs~1);

            switch (~laosEventArgs~1.FlowBehavior)

            {

                case FlowBehavior.Continue:

                case FlowBehavior.Return:

                    return;

            }

            throw;

        }

        finally

        {

            ~PostSharp~Laos~Implementation.NameAspect~3.OnExit(~laosEventArgs~1);

        }

    }


    public void someMethodInA() {}

}

I really don’t know what’s that all about but I can see that there is code added only to the constructor, someMethed() is empty as in my given source code.

In the next weeks I will try to cover more examples and solutions with PostSharp and AOP.

GPS Logger Wintec G-Rays 2 and GPS Babel

Tags: , ,
1 Comment »

Previously I wrote about geotagging and my photo tagging software PhotoTagStudio has build in support to tag photos with GPS coordinates from nmea files. I used to generate these nmea log files with a Windows CE PDA and imported the log files into my photos with PhotoTagStudio.

Now I bought a small GPS receiver with a build in datalogger. It’s named Wintec G-Rays 2 or WBT-201. And by the way: it is a great idea giving one product one or more name nobody can remember. For some reason Apple products always have only one name everybody can always remember. Back to my new WBT-201: it is very small, cost about 100 €, has a build in rechargeable battery and can be used as an ordinary Bluetooth GPS receiver. But besides this it can act as a GPS logger and store up to 130000 GPS positions.
I bought this device only for logging and combining these data with photos using PhotoTagStudio.

The software for configuring and getting the logged data is called Time Machine X and looks and acts like crap. It looks like written by an amateur programmer using Visual Basic 3 on Windows 3.11. But you need this software to configure the logger. I set it to capture every 2 seconds the position. That’s it. To use the logger you need only turn the power on and it’s working. With the track button you can record some waypoints at the given position but I didn’t use this feature.

To read the logs you can use Time Machine X, but I don’t like it and you cannot script this application. An alternative is the open source software GPS Babel. GPS Babel can read and write nearly every GPS related file format. So you can read the data directly from a serial COM port (this can be the USB or a Bluetooth connection to the WBT) and write it as a nmea file.

The following command reads from COM10 (this is a Bluetooth serial port an my computer) and writes a nmea file named out.nmea:
gpsbabel.exe -t -w -i wbt -f com10 -o nmea -F out.nmea

To delete the logged date from the WBT device you can use the following command:
gpsbabel.exe -t -w -i wbt,erase -f com10 -o nmea -F out.nmea

The -t parameter reads the whole logged track and the -w parameter reads the recorded waypoints.
The output file can be read by PhotoTagStudio v.6.2 and above and other software that is capable of reading nmea files. Or you can use GPS Babel to create files with other formats. For example kml files for Google Earth and Google Maps.

Now is only one thing missing: a display device for the GPS date and status when I am not caring my PDA or notebook with me. In will write another article where I will show how to use a mobile phone to display the data of a Bluetooth GPS receiver.

Something going on in 2008

Tags:
No Comments »

I started this blog in November 2006 as a secondary blog besides my private Livejournal and didn’t know where it was going. I posted a few random links and news stories from the web and later some technical articles.

In the past year I posted more and more (but not on a regular basis) technical articles. Technical article means something I discovered or learned while working with computers, windows, programming and thing like that. Now I will turn this blog in a real tech blog.

First we changed the name: now this blog is called “Ticklish Techs – a mostly .NET but also some other cool techs blogâ€? and the name is pretty much a vague description of the upcoming content. Every time I have something to say about computers, software, programming (especially .NET) I will blog it here. And I will try to do this on a regular basis.

And of cause with a new name the blog needs a new domain: www.ticklishtechs.net

The second news: I have to introduce my new co writer: Wolfram. He’s a colleague and friend of mine from Düssledorf, Germany. We used to work together for different clients and still work on our private projects together. From my point of view he is one of the top 20 percent programmers I know. The first time he appeared here in September last year on an article regarding the Win32 shell. He will start to write more articles worth reading here soon.
I think 2008 will be interesting for us and this blog. Let’s see what’s coming. As a small outlook I will write some more articles on GPS and NMEA the next days and when I begin to work on my diploma thesis the next month I will certainly write some articles about Visual Studio 2008 (Orcas) Extensibility (VSX) and the DSL tools.

Setup Microsoft Help Explorer (Visual Studio Combined Help Collection)

Tags: ,
1 Comment »

As we all know, the main resource for help on Visual Studio and .net is the Microsoft Help Explorer that is installed with Visual Studio. Sometimes it is called the Visual Studio Combined Help Collection. Most of the Microsoft development tools (for example SDKs for Office and Visual Studio) but also tools from other vendors install their help resources into this Explorer.
It is really nice if it works. But on my system I ended up with not only one central Help Explorer but with three, each containing different content. One came with Visual Studio 2005, one with Orcas and another with the Visual Studio SDK. For some reason only the last one showed up the .net-framework help, but every time I pressed F1 in Studio the first one – without the content – opened.
I knew that there is somewhere a settings dialog where you can see the installed content of the Explorer and enable or disable some of it. But Microsoft does a very good job in hiding this dialog. It is shown like any page of the help. To find it just go to the Index and look for “Visual Studio 2005 Combined Help Collection Manager” or for Orcas Beta 2 “…2007…” – I think they will change the name in the final Visual Studio 2008.

WP Theme & Icons by N.Design Studio
Entries RSS Comments RSS Log in